 Ann & I went round & round about how to present the cookie information to you. A couple weeks ago, she baked these cookies for the first time. It was in the middle of the night with at least one too many trips to the grocery store – but that's another story. Last night, she made them again.
(Psst! We're donating $5 to Operation Christmas Child for every Cookie Press Stamp purchased from now until Halloween.)
So here are some tips to help you enjoy YOUR Cookie Press Stamp! First, let me tell you that Ann CAN cook – she just doesn't do it very much. She cooks for the holidays & can prepared a mean bowl of dry dog food. I'm just barking because if SHE can do it, anyone can! Click on any of the pictures for a closer look.

- Read the directions! The package includes two recipes that work well. This one is the sugar cookie receipe. (The other is shortbread.)
 – It really helps to chill the dough.. Ann chilled the dough after she rolled the balls. 45 minutes seemed to be a good amount of time. When she left them in longer, they were hard to press & they seemed to raise in the middle. (Longer was 2 hours when she left for a potluck dinner.)
– Chilled dough is less sticky, but dipping your stamp lightly into flour helps too.
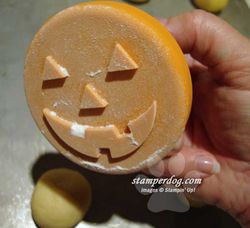
This one has a little too much. You can see it's stuck in his tooth.
Tapping it off before pressing will help with keeping the excess off. Keeping the flour on a saucer or some wax paper will help with easy clean up.
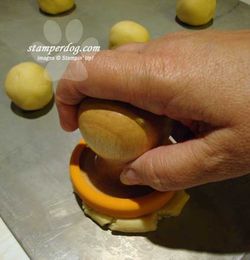
– Give it a good press. The colder the dough, the more effort you'll need. Do your best to keep it even so that your cookie can evenly bake.
If you like even edges, roll out your dough & cut it with a cookie cutter instead of doing the balls. If you want it fast or don't have rolling pin know how, then the balls are easy peasy!
We voted for the balls for less clean up.
 <<<<<<<<<<<<<<<<<<< This is what the first batch looked like that only chilled 20 minutes.
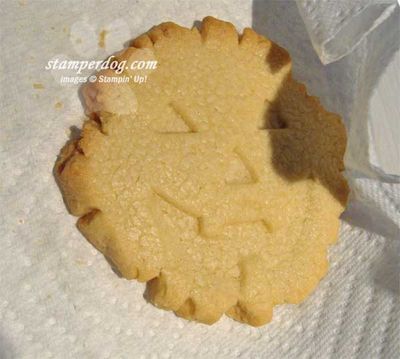
And here's what they looked like fresh out of the oven. >>>>>>>>>>>>>>>>>>>
Well, they hadn't escaped the oven yet, but you get the picture! They can be a little toasty around the edge, but not really brown. Note that they're pretty pale on the top. They're supposed to be that way.
 – Move them over to a rack for cooling. Be sure that you taste test them for quality control. Ann & my favorite huMAN seem to like them when they are just slightly cooled.
There are other recipes that you can try. Just make sure that your recipe doesn't call for baking powder because that makes the cookies rise & lose your imprint.
We posted a packaging idea in this post & Ann also shared an idea on Sacramento & Company shown in this post. Ann said the crew really liked them!
There's also a heart & a snowflake (shown in the first picture) that would work for other occasions too! This cookie press stamp is a great idea for a gift or to make gifts! And in keeping with the giving spirit, buying your Cookie Press Stamp here during the month of October will enable us to donate $5 to Operation Christmas Child to help with the postage for all those boxes of children's gifts that get shipped around the world.
– Here's an important thing to remember! If you're planning some pretty packaging, be sure to lock the cookies up first because you may come back to find very little to wrap!

In the meantime, I'll be guarding my post under the counter waiting for some crumbs! I can't wait until they try the peanut butter recipe!
It's a grrrrreat time to be the blog dog of a Stampin' Up! Demonstrator.
OR – by phone – 530-674-5090, by fax – 530-751-7680, by email or even in person!
It gRRRRROCKS when you join our team!


Recent Comments