It sure was fun yesterday with so many of you making the time to make a card from scratch with us.
You helped me keep Ann on the straight and narrow. Because of that, Ann finished the card right after we ended the craft break live stamping show.
You many have seen it but we’re going to give you some behind the scenes tips today as well as a supply list.
Here’s how the card turned out. (The little silver frame was the inspiration piece but we had the vellum hanging out on the stamp table too.

Isn’t it gorgeous? My favorite huMAN loved it too! But then, he likes anything that has blue on it.
Here are some tips on how she was making a card from scraps.
Card Making Tips

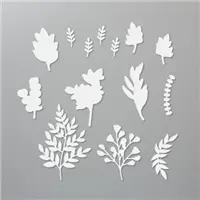
Ann stamped the leaves in Pretty Peacock on the Whisper White layer while she was still live on the craft break. After some additional creative tearing, she used Mini Glue Dots to attach the dry embossed vellum piece to the layered card base.
NOTE: Remember where those Mini Glue Dots are because you’ll want to cover them up later.

Then she carefully added some Liquid Glue to the back of the silver frame and placed it on the card.

After a little one-on-one time with our new Cut & Emboss Machine, we placed the leaves and greenery on the layered card base with Stampin’ Dimensionals.
And lastly, she put the greeting on there.

It was so much fun making a card from scraps with you. You can watch the video on YouTube here.
Card Making Supplies
Ann did promise that she’d share how to make this card. Remember that you save 10% when you bundle things together – like the Forever Greenery Dies and the Forever Fer stamp set.

Copy and Use TBDGDTBN when you shop 


Recent Comments